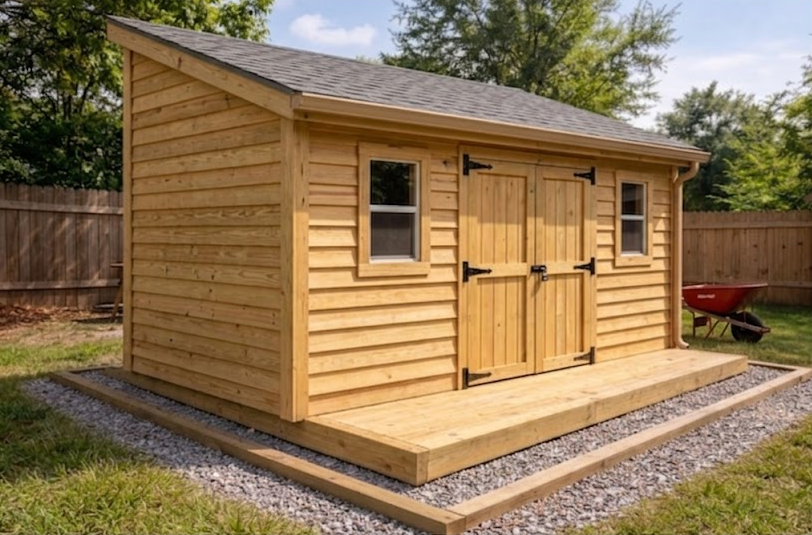
I always recommend the “Lean-To” style to first-time builders because it literally cuts the roofing work in half, as you only have to worry about one slope, one gutter, and zero complex ridge caps.
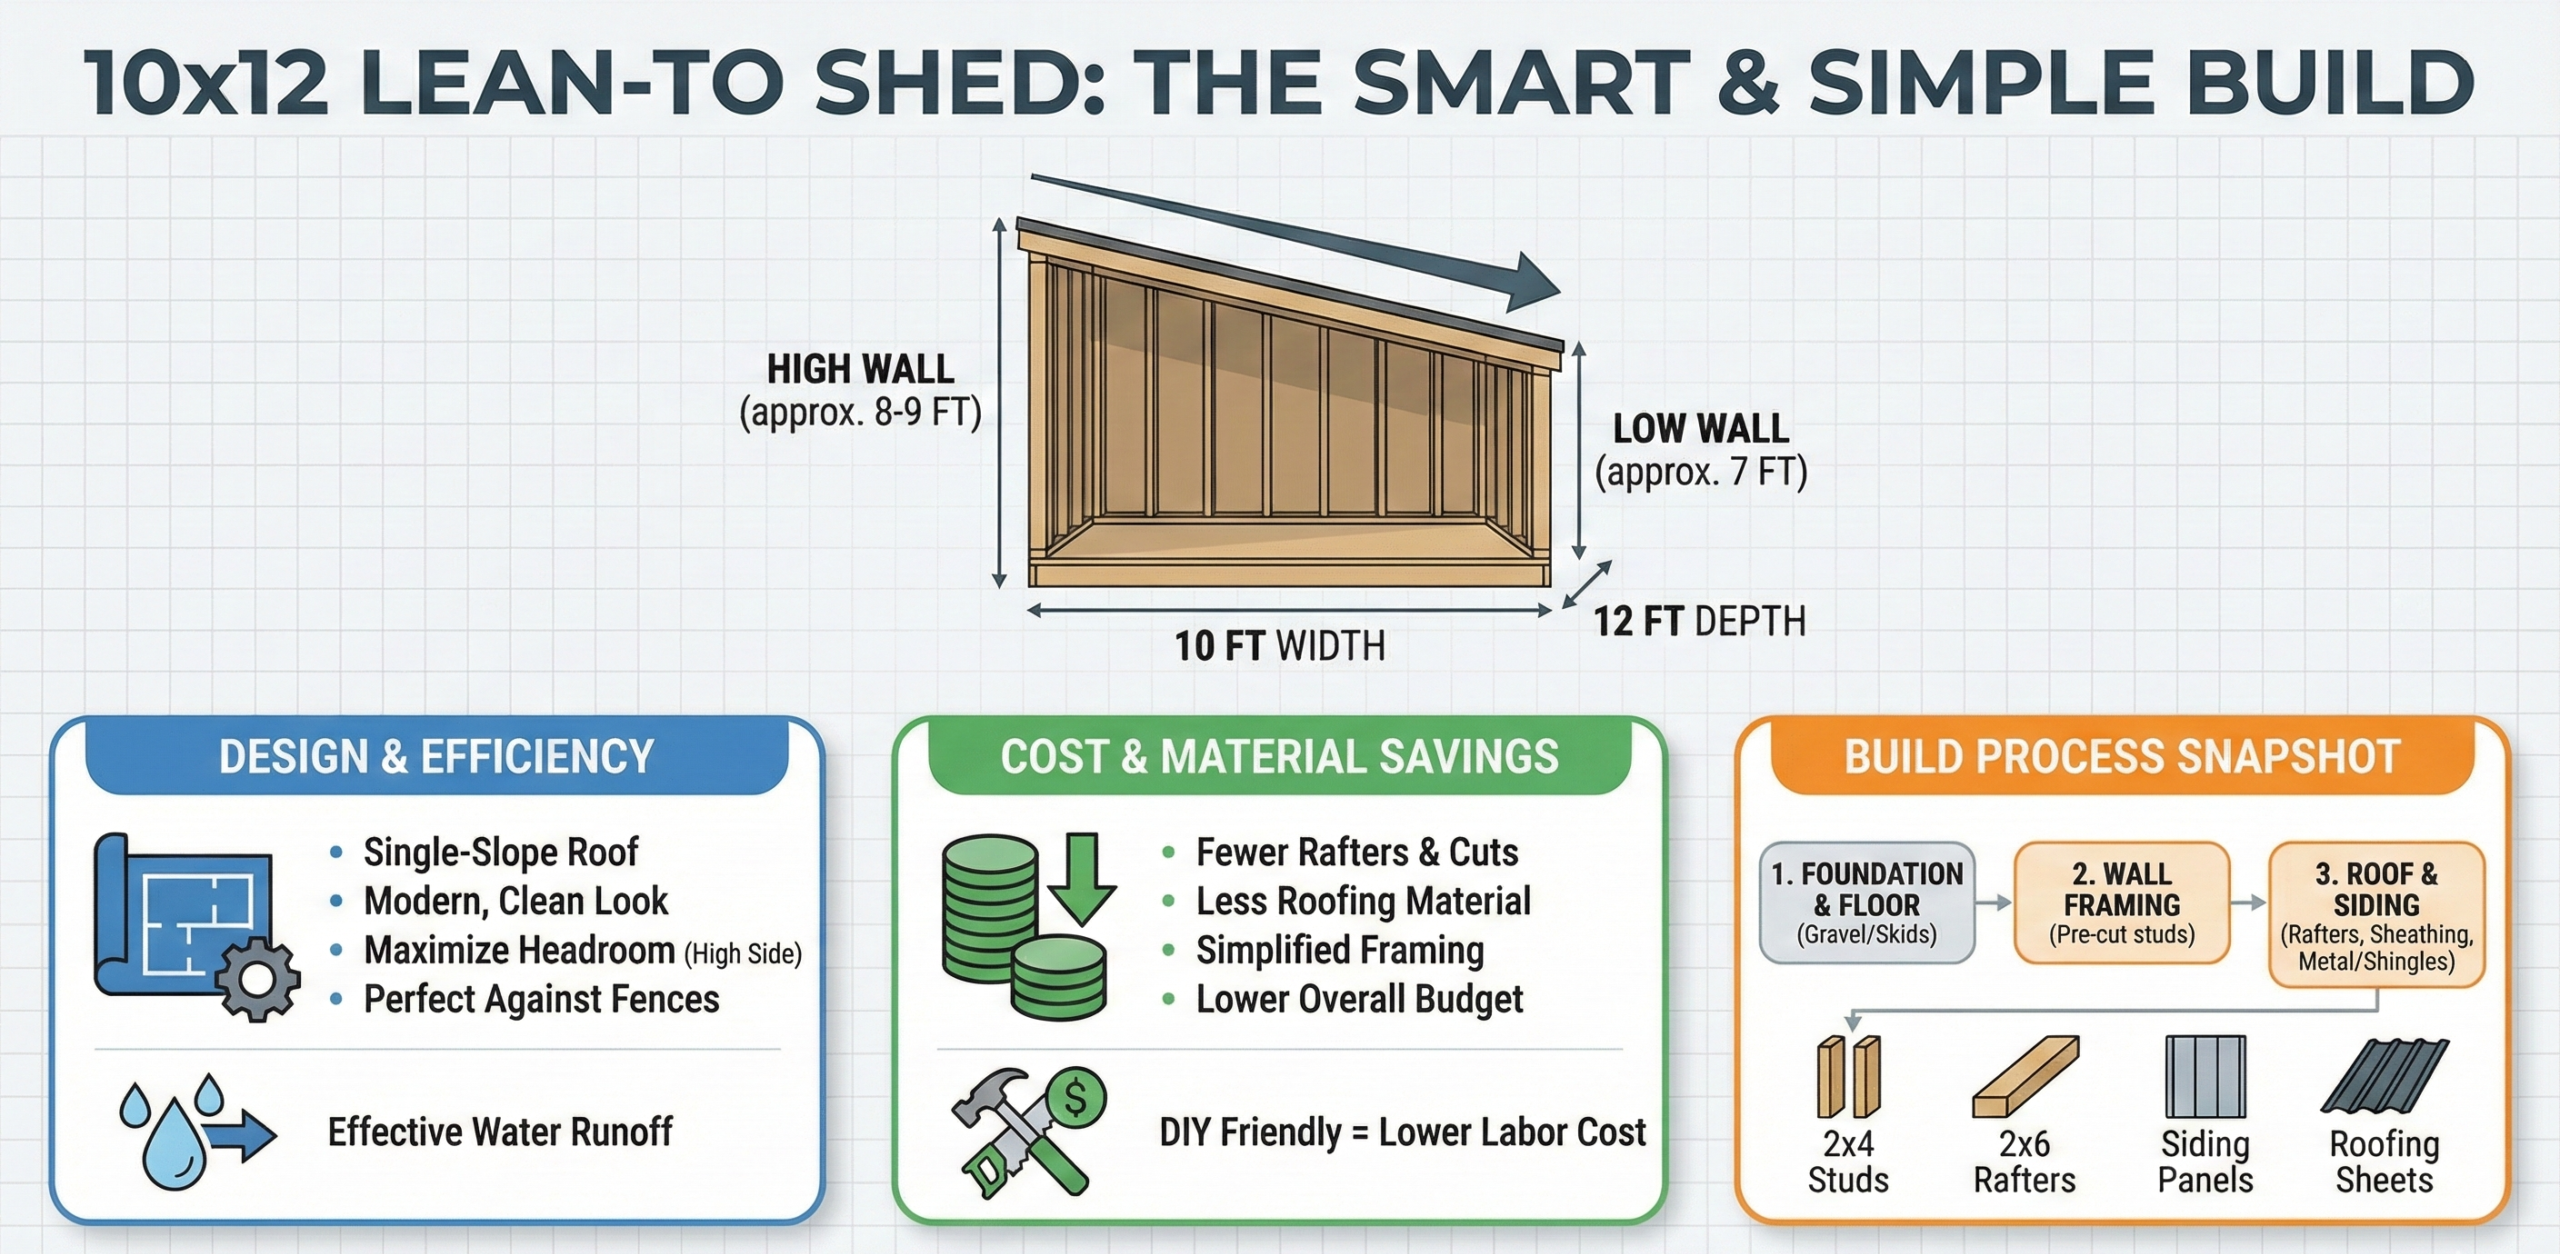
If you are looking at lean to shed plans because you have a tight budget or limited space against a fence, you are making the right choice. The single-slope design (also called a “skillion” or “mono-pitch” roof) is modern, drains water effectively, and uses less lumber than a traditional gable shed.
This guide breaks down exactly why the 10×12 Lean-To is the smartest build for beginners, how to calculate the roof pitch, and what materials you need to get started.
What is a Lean-To Shed?
A lean-to shed is defined by its roof: a single plane that slopes from a “High Wall” down to a “Low Wall.”
🚧 Planning Your Next Build?
Don't start without the Ultimate Guide: Barns, Sheds & Outbuildings. It’s the "DIY Bible" containing:
- 100+ Plans: Barns, sheds, garages, and playhouses.
- Step-by-Step: Covers foundations, framing, wiring, and roofing.
- Blueprints: Includes info on ordering CAD files.
As an Amazon Associate, I earn from qualifying purchases at no extra cost to you.
Unlike a gable shed (which looks like a triangle), a lean-to offers a simple, box-like interior with plenty of headroom on the high side. It gets its name because originally, these structures were built “leaning” against existing barns or houses. Today, most 10×12 lean-to sheds are freestanding structures.
Why Choose Lean-To Shed Plans? (The Pros)
When comparing different shed plans, the lean-to stands out for three reasons:
⚠️ Avoid Lumber Waste
Don't guess measurements! Get the exact cutting list and step-by-step blueprints for this 10x12 build.
As an Amazon Associate, I earn from qualifying purchases. This helps support our free DIY guides at no extra cost to you.
- Fastest Construction: You don’t have to cut complex “birdsmouth” notches in rafters or align a center ridge board. The rafters simply sit across the top plates.
- Cheaper Materials: Because the roof surface area is often slightly smaller and requires fewer shingles and ridge cap accessories, you save money.
- Water Management: Since the roof only slopes one way, you can direct all rainwater to the back of the shed (away from the door). This is excellent for keeping your entryway dry.
Tools Required for This Project
Before breaking ground, having the right gear on hand is the best way to ensure your build goes smoothly. You do not need a professional workshop, but a few reliable, heavy-duty essentials are a must for accurate framing and long-term maintenance. Here is exactly what I recommend to get the job done right.
As an Amazon Associate, I earn from qualifying purchases. This helps support our free DIY guides at no extra cost to you.
Power Tools & Safety Gear
Safety First: Proper protection is non-negotiable. Always use safety glasses and ear protection when operating power saws and drills.
- Circular Saw: DEWALT DWE575SB (The professional’s choice)
- Power Drill / Driver: DEWALT 20V MAX Drill Driver Kit (Best value)
- Speed Square: Swanson S0101 (The industry standard)
- 4-Foot Level: Stanley FATMAX (Ensures straight walls)
- Claw Hammer: Estwing E3-16C Steel Hammer
- Safety Glasses: 3M Virtua CCS Anti-Fog
- Work Gloves: Mechanix Wear The Original
- Ear Protection: 3M Peltor X5A Earmuffs
The Critical Math: Determining the “Pitch”
The most important part of building a lean-to is deciding the height difference between your front and back walls. This creates the “pitch.”
For a standard 10×12 shed, you want a minimum pitch of 2:12 (2 inches of rise for every 12 inches of run) to ensure proper drainage.
- The High Wall: Typically framed at 8 feet or 9 feet high.
- The Low Wall: Typically framed at 7 feet high.
Pro Tip: If you live in an area with heavy snow, increase the pitch to 3:12 or 4:12. A steeper slope helps snow slide off, preventing heavy weight from collapsing your rafters.
Material differences required for a 10×12 Lean-To Shed Build
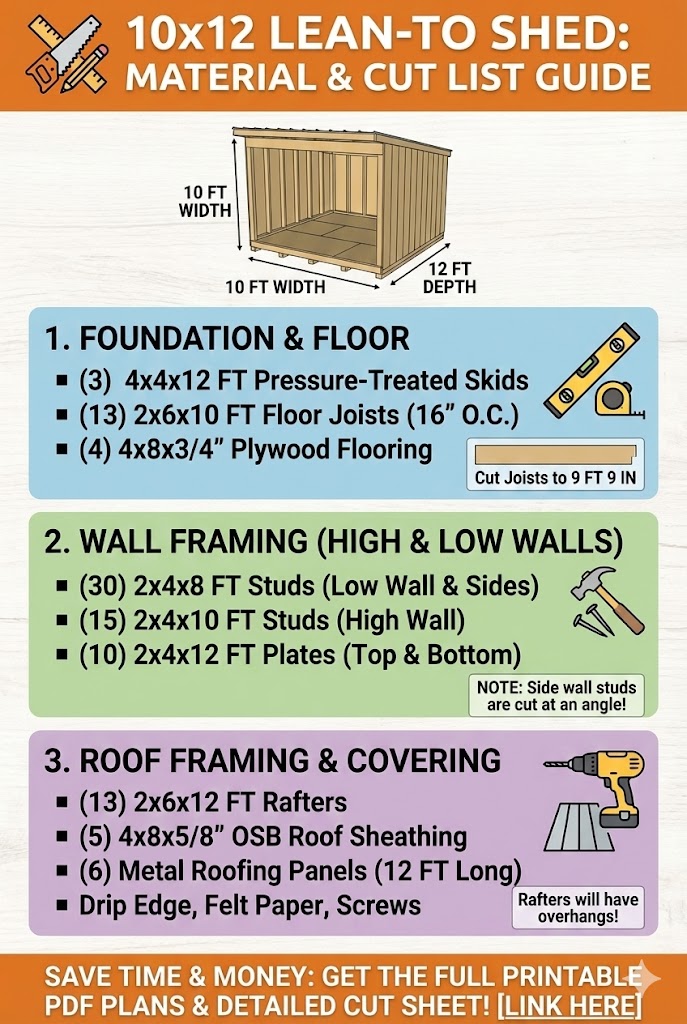
While the floor frame (pressure-treated 2x6s) and wall studs (2x4s) are identical to other sheds, the roof list changes:
- Rafter Length: For a 10-foot wide shed, you will need 12-foot 2×6 lumber for rafters to allow for overhangs on both the high and low sides.
- Siding: You will need slightly more siding for the “High Wall” and the angled side walls compared to a standard low-profile shed.
- Roofing: Lean-to sheds look fantastic with Metal Roofing Panels. Metal sheets are easy to install on a single slope and last 40+ years.
The Complete Step-by-Step Construction Guide (10×12 Lean-To Shed)
Building a shed is a process of stacking layers. If the bottom layer is wrong, the top layer won’t fit. Follow this detailed roadmap to get it right.
Step 1: Site Preparation & Foundation
- Site Selection: Choose a spot with at least 3 feet of clearance on all sides for painting and maintenance. Avoid low spots where water pools.
- The Gravel Pad (Recommended): Excavate a 12′ x 14′ area roughly 4 inches deep. Fill it with ¾” crushed stone. This allows for drainage and prevents your wood skids from sitting in mud.
- The Skids: Place two pressure-treated 4×4 skids (12 feet long) on the gravel.
- Pro Tip: Space the skids roughly 7-8 feet apart. If they are too wide, the floor joists will sag in the middle. If they are too close, the shed will feel “tippy.”
- Leveling: Use a 4-foot level. If one side is low, use a car jack to lift the skid and pack more gravel underneath until perfectly level.
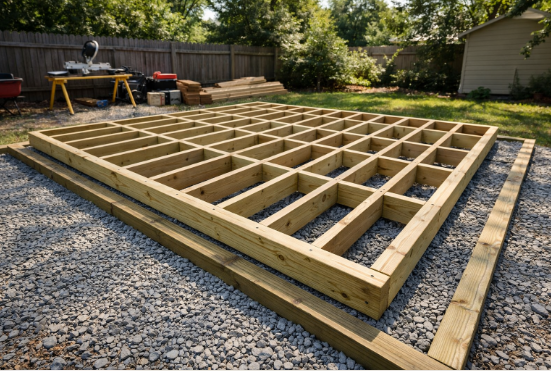
Step 2: The Floor Platform (10×12)

- The Rim Joists: Cut two pressure-treated (PT) 2×6 boards to exactly 12 feet long. Cut two more to 117 inches (10 feet minus the thickness of the two 12-foot side rims).
- Joist Layout: Mark the 12-foot rim joists every 16 inches on-center (OC).
- Assembly: Nail the frame together using 3-inch hot-dipped galvanized nails. (Standard sinkers will rust in treated wood).
- Square the Frame: Measure diagonally from corner to corner. Both diagonals must match (approx. 15 feet, 7 ¼ inches). If they don’t, hit the corner with a sledgehammer until they do.
- Subfloor: Install three sheets of ¾” Tongue & Groove plywood. Use construction adhesive on the joists before nailing to prevent squeaks.
Step 3: Framing the High & Low Walls
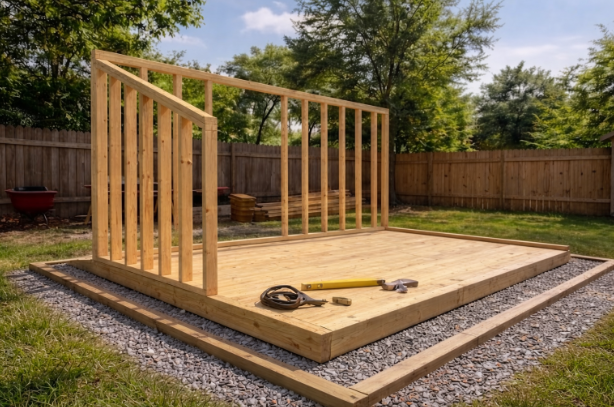
- The High Wall (Front): Frame this wall to a height of roughly 8 feet, 10 inches (106 inches).
- Door Rough Opening: If installing a pre-hung door, frame the opening 2 inches wider and 2 inches taller than the door unit. Use a double 2×6 header supported by “jack studs.”
- The Low Wall (Back): Frame this wall to a standard 7 feet (84 inches). This height difference creates your roof pitch.
- Lifting: Lift the walls into place. Secure them to the floor with nails every 16 inches. Use a level to ensure they are “plumb” (vertically straight) and brace them temporarily with scrap 2x4s.
Step 4: Framing the Side Walls
- The Angle: The top plates of your side walls need to connect the Low Wall to the High Wall.
- In-Fill Framing: The easiest method is to build a standard 7-foot square wall first. Once installed, frame the triangular “wedge” separately and toenail it on top to match the slope.
- Stud Alignment: Ensure the studs in your side walls line up directly under the rafter locations if possible, though this is less critical with a double top plate.
Step 5: The Lean-To Roof System
This is the distinct feature of this build. You will use 2×6 lumber for the rafters.
- Rafter Length: Cut your rafters to roughly 12 feet. This provides a 10-foot span to cover the shed, plus overhangs.
- Overhangs:
- Front: 12-16 inches (Protects the door from rain).
- Back: 6 inches (Keeps water off the back siding).
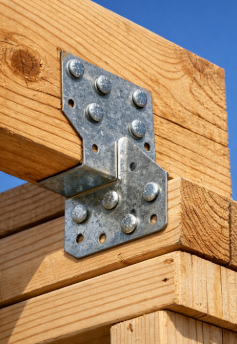
- Fastening: Mark the rafter locations on top of the front and back walls (24 inches on-center). Place the rafters and secure them with hurricane ties.
- Why Hurricane Ties? Putting a nail through the rafter into the top plate (toe-nailing) is weak. Metal ties prevent wind from lifting your roof off.
Step 6: Sheathing & Waterproofing
- Wall Sheathing: Install T1-11 siding or OSB sheathing. Ensure the sheets hang down 1 inch below the floor frame to cover the gap between the floor and the wall (preventing pests).
- Roof Decking (Option A – Shingles): Install ½” OSB plywood over the rafters. Cover with 15lb roofing felt, then install asphalt shingles.
- Roof Decking (Option B – Metal): Screw 2×4 “purlins” horizontally across the rafters every 24 inches. Screw your metal panels directly to these purlins.
- Why Metal? It is lighter, faster to install, and works better on the lower pitch of a lean-to shed than shingles do.
Step 7: Trim & Finish
- Fascia Boards: Install 1×6 cedar or treated lumber on the ends of the rafters to hide the cut ends.
- Corner Trim: Install vertical 1×4 trim on all four corners. This covers the raw edges of your siding and makes the shed look professional.
- Paint/Stain: Apply two coats of high-quality exterior latex paint or solid stain immediately. Do not wait weeks, or the sun will warp your siding.
⚠️ Avoid Lumber Waste
Don’t guess measurements! Get the exact cutting list and step-by-step blueprints for this 10×12 build.
As an Amazon Associate, I earn from qualifying purchases. This helps support our free DIY guides at no extra cost to you.
Estimated Cost for a 10×12 Lean-To Shed
Because of the simpler roof structure, a lean-to is often the most budget-friendly option.
⚠️ Avoid Lumber Waste
Don't guess measurements! Get the exact cutting list and step-by-step blueprints for this 10x12 build.
As an Amazon Associate, I earn from qualifying purchases. This helps support our free DIY guides at no extra cost to you.
- Economy Build (T1-11 Siding, Asphalt Shingles): $1,100 – $1,400
- Standard Build (SmartSide, Metal Roof): $1,600 – $2,100
- Premium Build (Windows, Modern Doors, Insulation): $2,500+
Is a Lean-To Shed Right for You?
If you want a workshop with high ceilings for storing tall items (like ladders or lumber) on one side, this design is perfect. It is also the best choice if you are building close to a property line and need to direct water runoff into your own yard, not your neighbor’s.
However, if you want overhead “attic” storage, you might prefer a Gable or Barn style roof.
Final Thoughts
Building from lean to shed plans is the quickest path from “buying lumber” to “finished shed.” The modern look adds value to your backyard, and the straightforward framing makes it nearly impossible to mess up.
Frequently Asked Questions
Can I build a lean-to shed against my house?
While possible, it is riskier for beginners. Attaching a shed to a house requires flashing to prevent rot and may legally classify the shed as a “home addition,” triggering strict permit and tax requirements. A freestanding unit 3 inches away is often simpler.
What is the best roof pitch for a lean-to shed?
A 2:12 pitch is the standard minimum for drainage. For a 10-foot wide shed, this means the front wall is roughly 20 inches taller than the back wall. If you use shingles instead of metal, consider a steeper 3:12 pitch to prevent leaks.
Is a lean-to shed cheaper to build than a gable shed?
Yes. You save approximately 15-20% on materials because you avoid complex roof trusses, ridge vents, and extra cuts. The waste factor is significantly lower.