Ready to break ground? Follow this step-by-step guide on how to build a 10×12 shed. From foundation to roofing, we cover the construction process for DIYers.
When I stared at the pile of lumber for my first build, I was honestly terrified I would mess up the cuts and waste $500. But once I laid out the first wall, I realized it’s just adult Lego—you just need to follow the sequence.
So, You Want to Build It Yourself?
You have picked the perfect size. A 10×12 shed offers 120 square feet of potential—enough for a workshop, a garden sanctuary, or just a place to hide the lawnmower. But looking at a pile of lumber is very different from looking at a finished building.
The gap between the two is simply process.
🚧 Planning Your Next Build?
Don't start without the Ultimate Guide: Barns, Sheds & Outbuildings. It’s the "DIY Bible" containing:
- 100+ Plans: Barns, sheds, garages, and playhouses.
- Step-by-Step: Covers foundations, framing, wiring, and roofing.
- Blueprints: Includes info on ordering CAD files.
As an Amazon Associate, I earn from qualifying purchases at no extra cost to you.
Building a shed isn’t about being a master carpenter; it’s about following a logical sequence of steps. If you can read a tape measure and use a circular saw, you can build this.
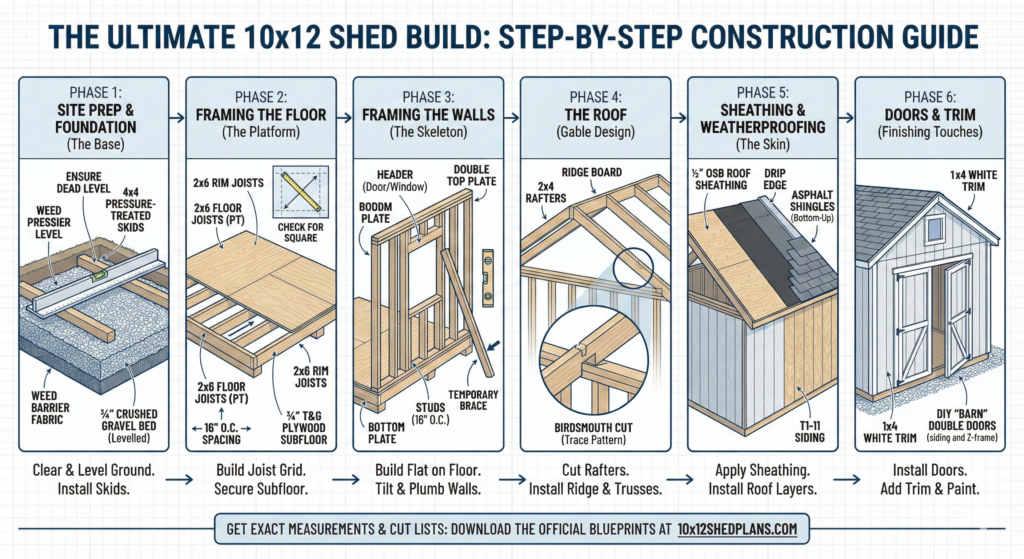
Phase 1: Site Prep & The Foundation
The most critical part of the build happens before you touch a piece of wood.
⚠️ Avoid Lumber Waste
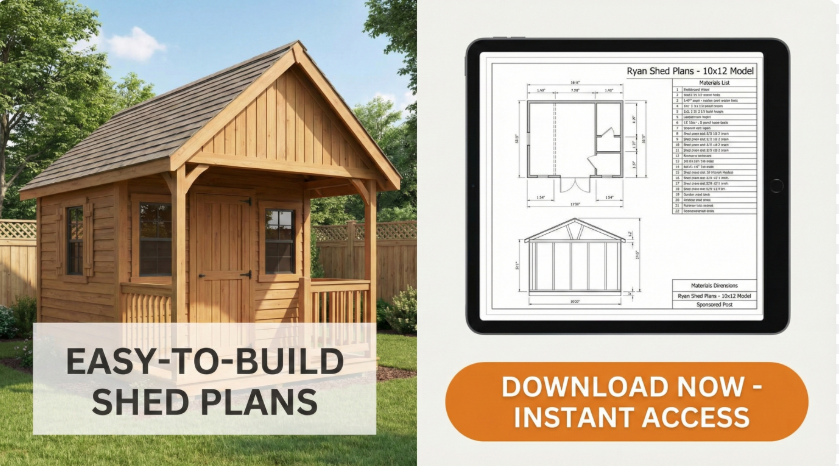
Don't guess measurements! Get the exact cutting list and step-by-step blueprints for this 10x12 build.
As an Amazon Associate, I earn from qualifying purchases. This helps support our free DIY guides at no extra cost to you.
A shed is only as good as the ground it sits on. If your foundation shifts, your doors won’t close and your roof will leak. For a DIY 10×12 build, we recommend a Skid Foundation over a concrete slab. It is cheaper ($200 vs. $1,000+), easier to install, and provides excellent airflow.
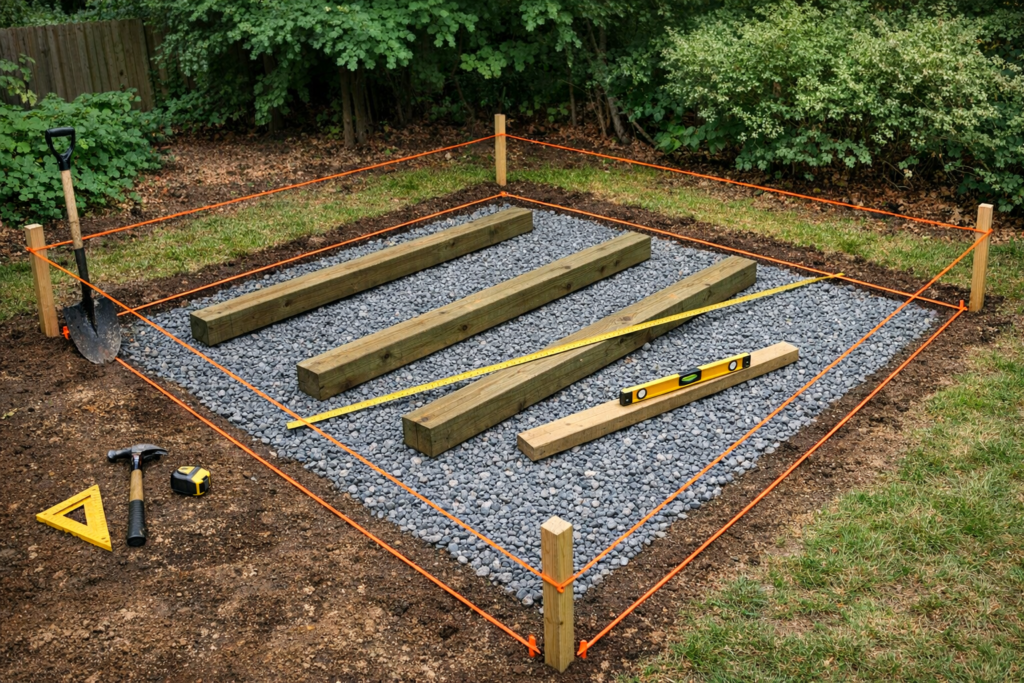
1. Location and Leveling
Don’t just eyeball it. Use stakes and string to mark your 10×12 footprint (plus 1 foot of clearance on all sides).
- Excavation: Remove the sod (grass) and topsoil about 3-4 inches down.
- Gravel Base: Fill the area with ¾” crushed stone. This allows water to drain away from your wood.
- Leveling: This is non-negotiable. Use a long 2×4 and a 4-foot level to “screed” the gravel flat.
2. The Skids (The Runners)
You will typically use Pressure-Treated 4×4 timbers.
- Place them on the gravel bed.
- Check for “square” by measuring diagonally from corner to corner. If the numbers match, your foundation is square.
Phase 2: Framing the Floor Platform
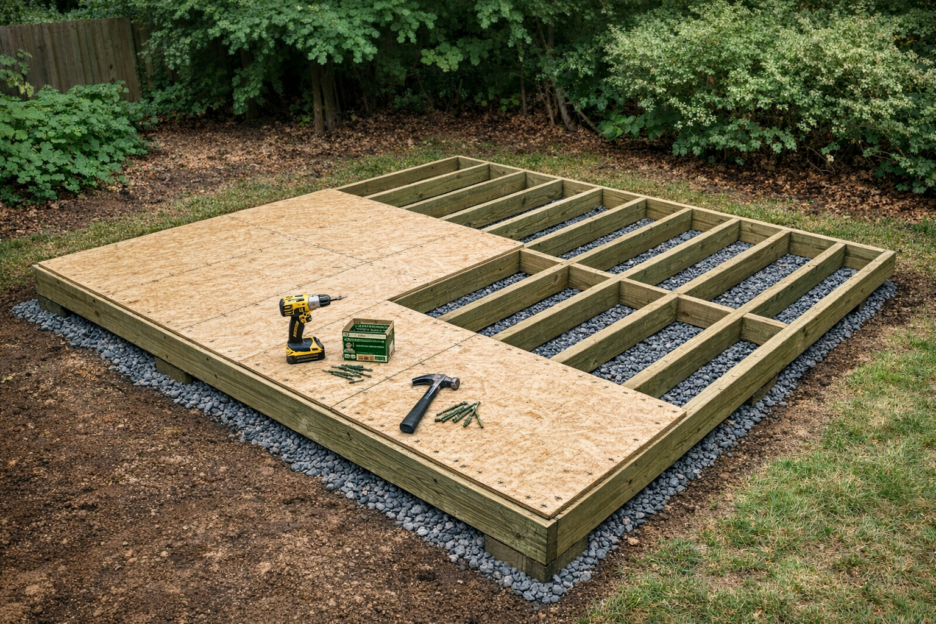
Think of this like building a wooden deck.
This platform must be strong enough to hold heavy weight (like a riding mower) without bowing.
1. Lumber Selection
Crucial Tip: You must use Pressure-Treated (PT) lumber for the floor frame. Standard “white wood” or pine will rot within a few years if it is this close to the ground.
2. Joist Spacing
For a 10×12 shed, arrange your 2×6 rim joists to form the outer box. Inside, run your floor joists perpendicular to the skids.
- The Golden Rule: Space your joists 16 inches on-center (O.C.). This standard spacing ensures that your plywood subfloor creates a rigid, non-bouncy surface.
3. The Subfloor
Lay down ¾” Tongue-and-Groove plywood. Why “Tongue-and-Groove”? The sheets lock together at the seams, preventing the floor from flexing where two sheets meet.
- Fastening: Use 2-inch exterior deck screws or ring-shank nails.
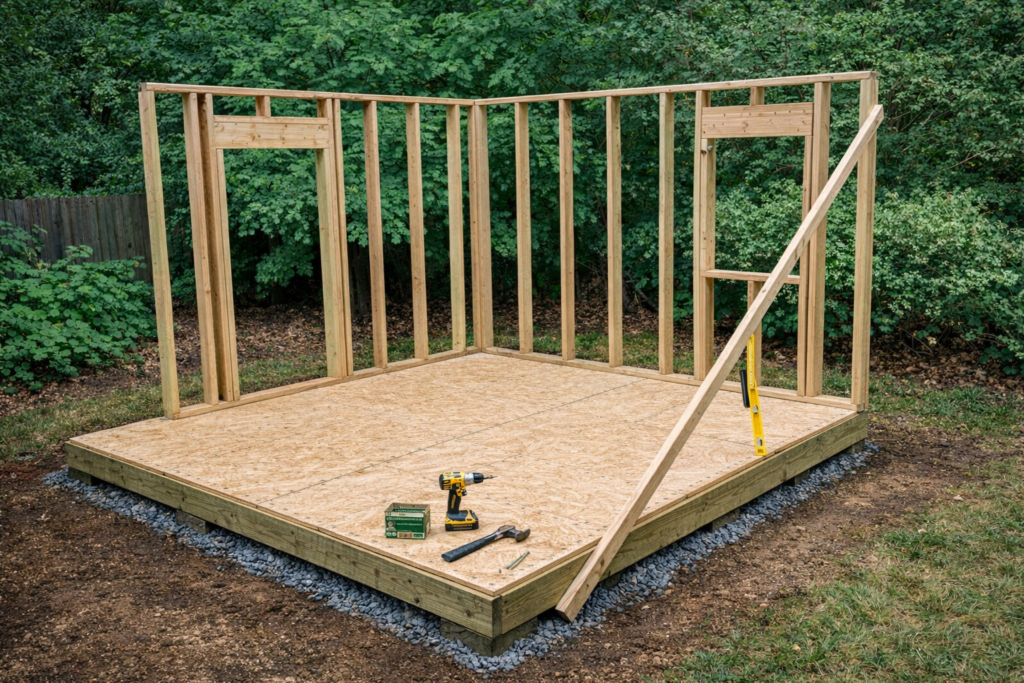
Phase 3: Framing the Walls
Work smarter, not harder.
Do not try to build your walls vertically in the air. The professional method is to build them flat on the shed floor and then tilt them up.
1. Layout and Plates
You will need a “Top Plate” and a “Bottom Plate” for each wall. Mark your stud locations on both plates at the same time to ensure they line up perfectly.
2. Headers (Don’t Skip This)
Wherever you have a door or window, you cannot just interrupt a stud. You need a header.
- A header is a beam (usually two 2x6s sandwiched with plywood) that spans the opening. It carries the weight of the roof around your door frame. Without a header, the roof weight would crush your door and it would never open.
3. Raising the Walls
This is the moment it starts looking like a building.
- Lift the wall.
- Align the bottom plate with the edge of your floor.
- Plumb it: Use a level to ensure it is perfectly vertical.
- Brace it: Screw a temporary 2×4 diagonally to hold it in place.
- Repeat for all four walls, interlocking the corners (known as a “double top plate”).
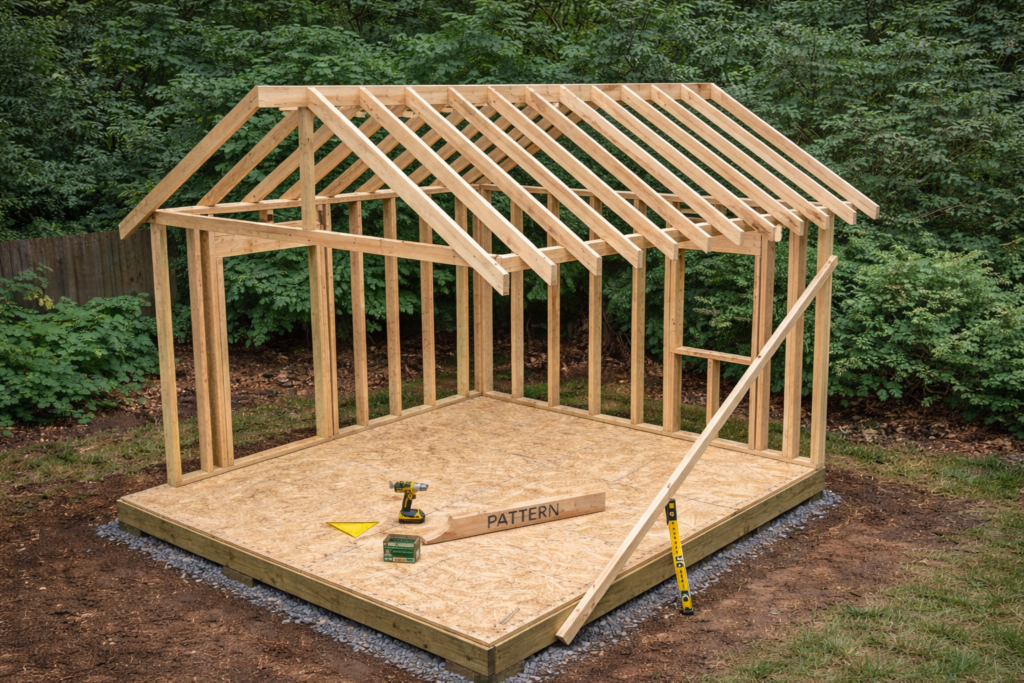
Phase 4: The Roof (The Gable Design)
The intimidating part made simple.
Most 10×12 sheds use a Gable Roof (the classic triangle). It sheds snow easily and offers overhead storage space.
⚠️ Avoid Lumber Waste
Don't guess measurements! Get the exact cutting list and step-by-step blueprints for this 10x12 build.
As an Amazon Associate, I earn from qualifying purchases. This helps support our free DIY guides at no extra cost to you.
1. The Ridge Board
This is the spine of your roof. It runs the entire length of the shed at the very peak.
2. Cutting Rafters (The Birdsmouth)
Rafters need a special notch called a “birdsmouth” to sit flat on top of your walls.
- Don’t measure every single one. Cut one rafter perfectly. Test fit it. If it works, label it “PATTERN” and use it to trace all the others. This ensures every single rafter is identical.
3. Stick Framing vs. Trusses
- Stick Framing: You install the ridge board and nail rafters to it one by one. Good for solo builders.
- Trusses: You build the triangles on the ground (using the floor as a template) and lift them up whole. This is often easier for beginners.
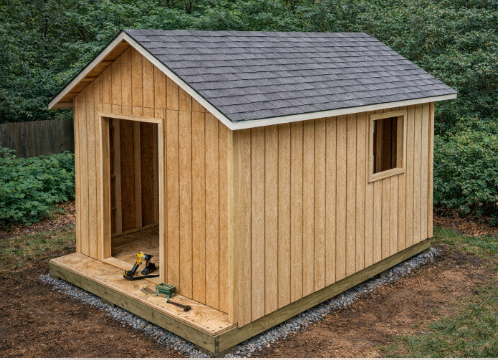
Phase 5: Sheathing and Weatherproofing
Sealing the envelope.
Once the skeleton is done, you need to put skin on the bones.
- Wall Sheathing: T1-11 siding is the most popular choice for 10×12 sheds. It acts as both the structural sheathing and the cosmetic siding. It comes in 4×8 sheets and gives that rustic “barn” look.
- Roof Sheathing: Use ½” OSB (Oriented Strand Board). Nail it to your rafters.
- Drip Edge: Install metal drip edge around the perimeter of the roof. This small piece of metal prevents water from curling under the shingles and rotting your wood.
- Felt & Shingles: Staple down 15lb roofing felt (paper), then install your asphalt shingles from the bottom up.
Visit this guide for for in depth understanding and action plan for Sheathing and Weatherproofing: 10×12 Shed Weatherproofing Guide (Seal, Protect, and Extend the Life of Your Shed)
Phase 6: Doors and Trim
The finishing touches.
Buying vs. Building Doors
- Pre-Hung Doors: Easier to install but expensive ($300+).
- DIY “Barn” Doors: You can build robust double doors using the cutout scraps of your T1-11 siding reinforced with a “Z” frame on the back. This costs almost nothing and looks custom.
Trim: Wrap the corners and window edges with 1×4 white trim. This hides the seams and gives the shed that “finished” professional look.
Tools Required for This Project
Before breaking ground, having the right gear on hand is the best way to ensure your build goes smoothly. You do not need a professional workshop, but a few reliable, heavy-duty essentials are a must for accurate framing and long-term maintenance. Here is exactly what I recommend to get the job done right.
As an Amazon Associate, I earn from qualifying purchases. This helps support our free DIY guides at no extra cost to you.
Power Tools & Safety Gear
Safety First: Proper protection is non-negotiable. Always use safety glasses and ear protection when operating power saws and drills.
- Circular Saw: DEWALT DWE575SB (The professional’s choice)
- Power Drill / Driver: DEWALT 20V MAX Drill Driver Kit (Best value)
- Speed Square: Swanson S0101 (The industry standard)
- 4-Foot Level: Stanley FATMAX (Ensures straight walls)
- Claw Hammer: Estwing E3-16C Steel Hammer
- Safety Glasses: 3M Virtua CCS Anti-Fog
- Work Gloves: Mechanix Wear The Original
- Ear Protection: 3M Peltor X5A Earmuffs
Ready to Start Cutting?
BEST OF LUCK! Don’t forget to Share or PIN 📌 this guide.
If you prefer Lean-to shed style then you can check the click on the post below 👇 for lean to shed help guide: