My finished wooden birdhouse ready for spring nesting.
I’ve been spending my weekends looking for quick, rewarding projects that I can knock out in just a few hours. After staring at a pile of leftover pine planks sitting in the corner of my garage, I decided it was time to invite some local wildlife into my backyard. I wanted to build a simple wooden birdhouse from scratch.
I don’t have a massive workshop filled with expensive machinery. I just rely on basic hand tools and a bit of patience. If you’re looking for a beginner woodworking project that actually serves a practical purpose, I’m going to walk you through exactly how I put this backyard birdhouse together, step by step.
For those looking for the fast facts before firing up the drill:
- Skill Level: Absolute Beginner
- Time Required: 1 to 2 hours
- Estimated Cost: $10–$15 (or completely free if you have scrap wood)
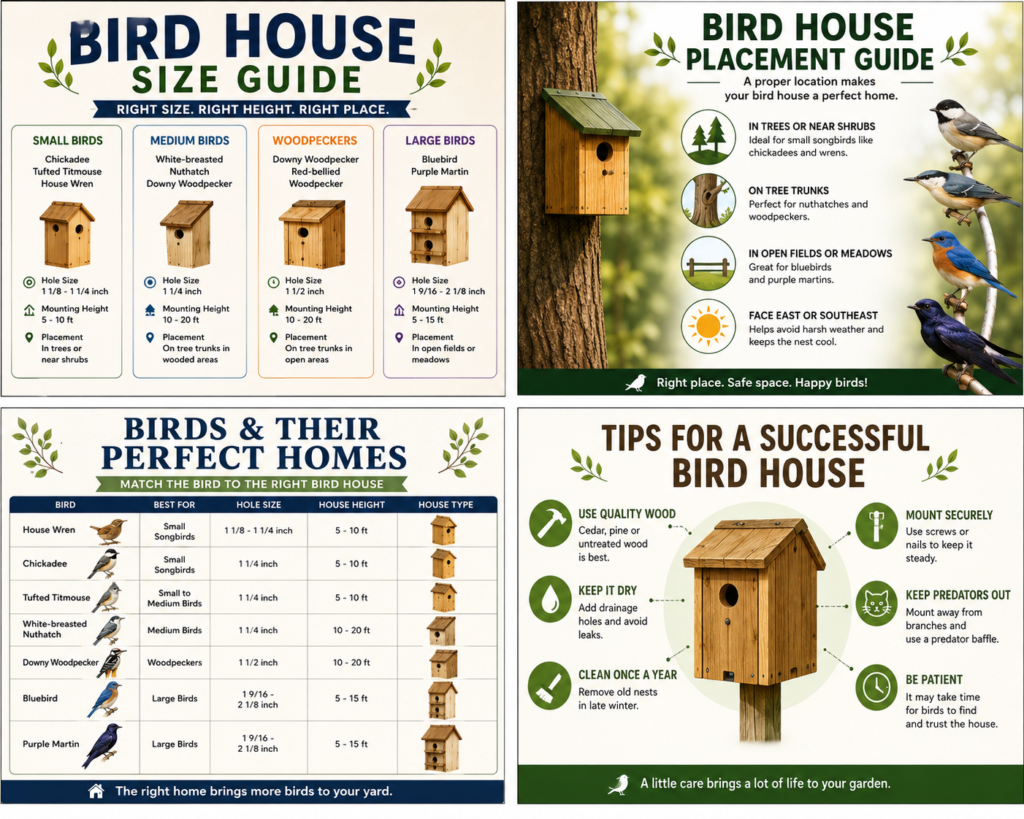
- Target Bird Species: Bluebirds and Tree Swallows
- Entrance Hole Size: 1.5 inches
- Wood Type Used: Solid pine planks
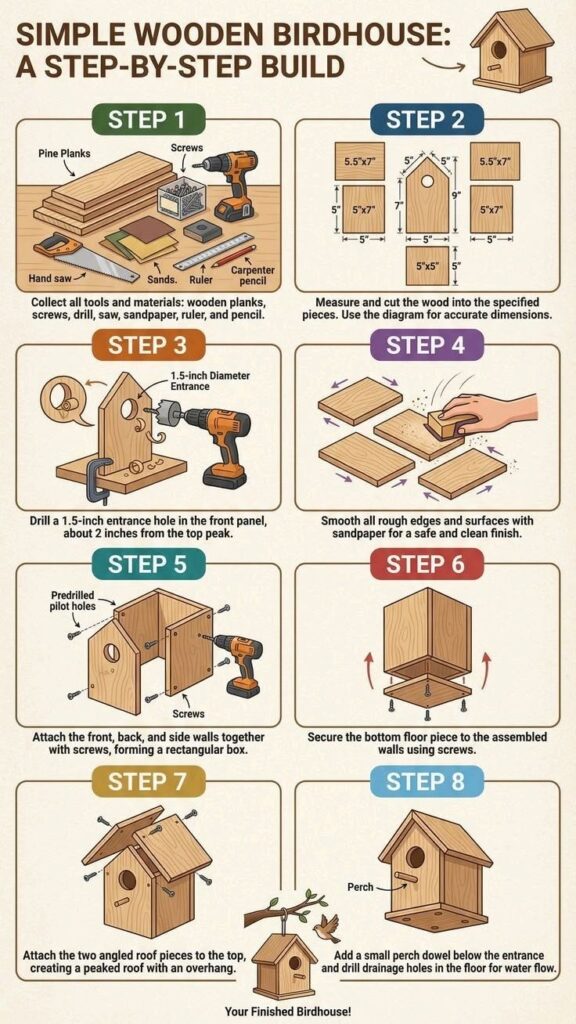
Step 1: Gathering My Tools and Materials
Laying out everything before making the first cut saves a lot of headaches later.


Before I make a single cut, I always organize my workbench. For this build, I chose standard unfinished pine. Pine is incredibly affordable and cuts like butter, making it perfect for beginners. While cedar is technically more weather-resistant, pine holds up just fine for a few seasons if you mount it in a protected area.
Here is the exact tool list I pulled together for this build:
🚧 Planning Your Next Build?
Don't start without the Ultimate Guide: Barns, Sheds & Outbuildings. It’s the "DIY Bible" containing:
- 100+ Plans: Barns, sheds, garages, and playhouses.
- Step-by-Step: Covers foundations, framing, wiring, and roofing.
- Blueprints: Includes info on ordering CAD files.
- Unfinished pine planks
- Exterior-grade wood screws
- A cordless drill with standard bits and a 1.5-inch spade bit (or hole saw)
- A traditional hand saw
- Medium-grit sandpaper
- A ruler and a carpenter pencil
Step 2: Measuring and Cutting the Wood
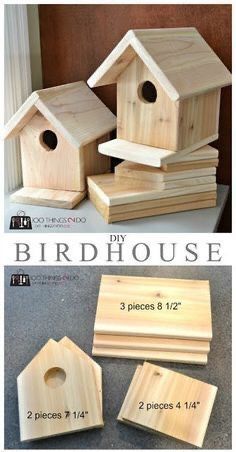
I learned the hard way a long time ago that measuring twice saves you a frustrating trip back to the lumber yard. I grabbed my ruler and carpenter pencil and marked out my pieces to create a classic peaked-roof design.
Here are the specific dimensions I cut for the birdhouse box:

- Floor: One square block cut to exactly 5″ x 5″.
- Sides: Two rectangular pieces cut to 5″ x 7″.
- Front and Back: Two pieces starting at 5″ wide, but with angled cuts at the top to form a peak.
- Roof Panels: Two pieces to form the pitched roof. I cut one at 5″ x 7″ and the second slightly wider at 5.5″ x 7″ so they overlap properly at the top.

Step 3: Drilling the Entrance Hole
Drilling the 1.5-inch hole. Sizing this right is the most important part of the build.
This step dictates exactly who gets to live in the birdhouse. I wanted to attract Eastern Bluebirds, so I loaded a 1.5-inch bit into my drill. Based on my experience and reading up on backyard birds, a 1.5-inch entrance is the “magic number”. It is perfectly sized for bluebirds and tree swallows, but it’s small enough to keep out aggressive, larger invasive birds like European starlings.

I marked my center point and drilled the 1.5-inch hole right into the front panel, positioning it about 2 inches down from the top peak.

Step 4: Sanding for Safety
Right after cutting and drilling, the pine was looking incredibly rough. Splinters and jagged edges are a major hazard for birds—especially when fragile nestlings are involved. I tore off a piece of medium-grit sandpaper and spent about ten minutes smoothing down every surface. I paid extra attention to the rim of the entrance hole, ensuring it was completely soft to the touch so the birds wouldn’t scrape their wings on the way in.

Step 5: Assembling the Main Walls
Pre-drilling pilot holes prevents the pine from splitting.
There is nothing worse than driving a screw into a perfectly measured piece of wood only to watch it split right down the middle. To prevent this, I always drill pilot holes first.
I stood the front, back, and two side walls upright to form a rectangular box. Holding the joints tight and flush, I drove my exterior screws into the predrilled pilot holes. The main body of the house felt solid instantly.

Step 6: Securing the Floor
With the four walls fully assembled, I flipped the box over and dropped the 5″ x 5″ bottom floor piece into the gap. I secured it to the assembled walls using screws from the outside.
I’ll share a quick tip from my own routine: I only put screws on two opposite sides of the floor block. By doing this, when the nesting season is over in the fall, I can just back out those two screws, drop the floor down, and easily clear out the old nesting materials to ready the box for spring.
Step 7: Attaching the Peaked Roof
Next, I tackled the roof. I took my two angled roof pieces (the 5″ x 7″ and the 5.5″ x 7″) and aligned them at the top of the walls. Because I cut one piece half an inch wider, it overlaps the narrower piece at the very peak, creating a watertight seam. I screwed both panels down tightly. The overhang on the roof is crucial because it keeps driving rain from blowing straight into the entrance hole.
Step 8: Finishing Touches (Perch, Drainage, and Airflow)
The final product, completely assembled and ready to hang.
For my final steps, I drilled a tiny hole just below the entrance and tapped in a small wooden dowel to act as a perch. Now, I have to be honest here—many experienced birders will warn you that a perch isn’t actually necessary. In some cases, a perch just gives predators like raccoons or cats a convenient handle to grab onto. I don’t have many predators in my fenced yard, so I kept the perch for aesthetic reasons, but if you have a lot of local wildlife, I highly suggest leaving the perch off entirely.
The absolute most important thing I did before calling this project done was flip the birdhouse completely upside down. I drilled four small holes directly into the floor panel. Drainage is critical. If a bad storm blows water into the house, those holes ensure the nest stays dry. I also left a tiny gap near the roofline to allow for airflow, keeping the birds cool during the hot summer months.

Frequently Asked Questions About Building Birdhouses
If you are thinking about trying this build yourself, you probably have a few of the same questions I had when I first started woodworking.
What is the best wood to use for an outdoor birdhouse?
I used standard white pine because it is incredibly cheap and easy for beginners to practice with. However, if you want a box that will last for a decade, I highly recommend buying untreated cedar. Cedar naturally resists rot, decay, and insect damage without needing any harsh chemical stains.
Should I paint or stain my birdhouse?
I strongly prefer leaving my birdhouses as raw, natural wood. If you feel you absolutely must paint yours, only paint the outside. Never paint or stain the inside of the box or the inner rim of the entrance hole, as the fumes and chemicals can be highly toxic to young birds. If you do paint the exterior, I suggest sticking to light, natural colors like tan or pale green to prevent the box from absorbing too much heat in the sun.
Where is the best place to mount this birdhouse?
I mounted mine on a smooth metal pole about five feet off the ground, facing away from prevailing winds. I try to avoid nailing birdhouses directly to tree trunks, as snakes, raccoons, and squirrels can easily climb the bark and raid the nest. Mounting it on a standalone pole with a predator baffle underneath gives your new backyard residents the best chance at a safe, successful nesting season.